A panel glue-up sounds simple. You put some glue on the edges, clamp them together with a row of IRWIN bar clamps, and wait overnight. That is the theory. In practice, most woodworkers end up with a panel that is bowed across the face, has a visible gap at one joint, or comes apart under the clamps when the glue starts to slide. I have done all three. After 25 years of gluing up panels in my garage shop, I have sorted out exactly where those problems come from and how to avoid them every time.
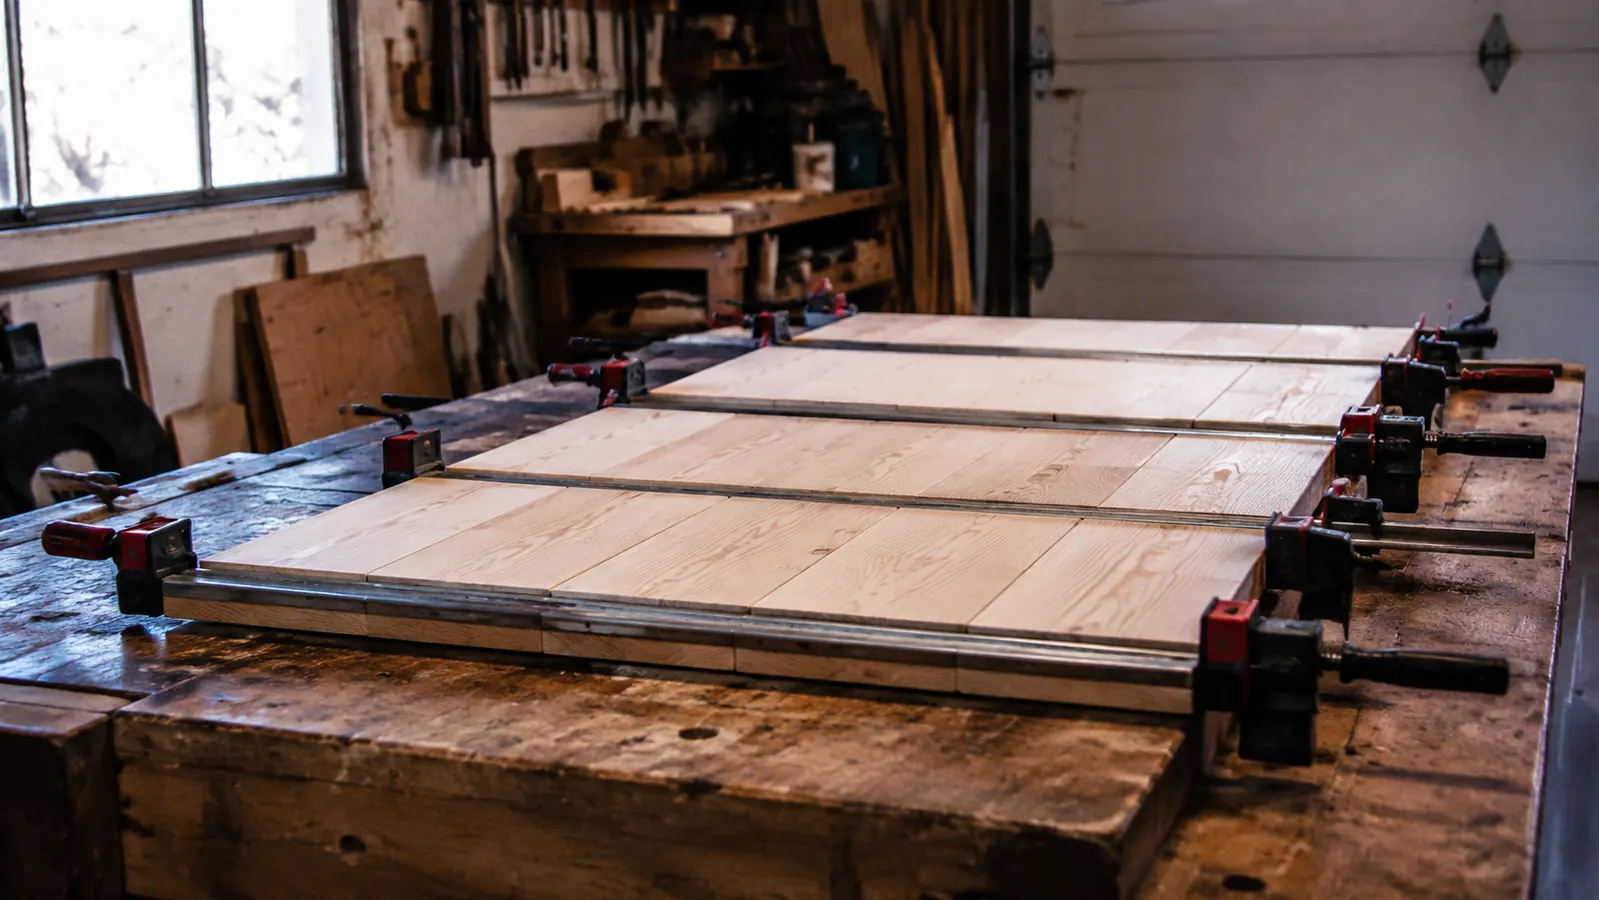
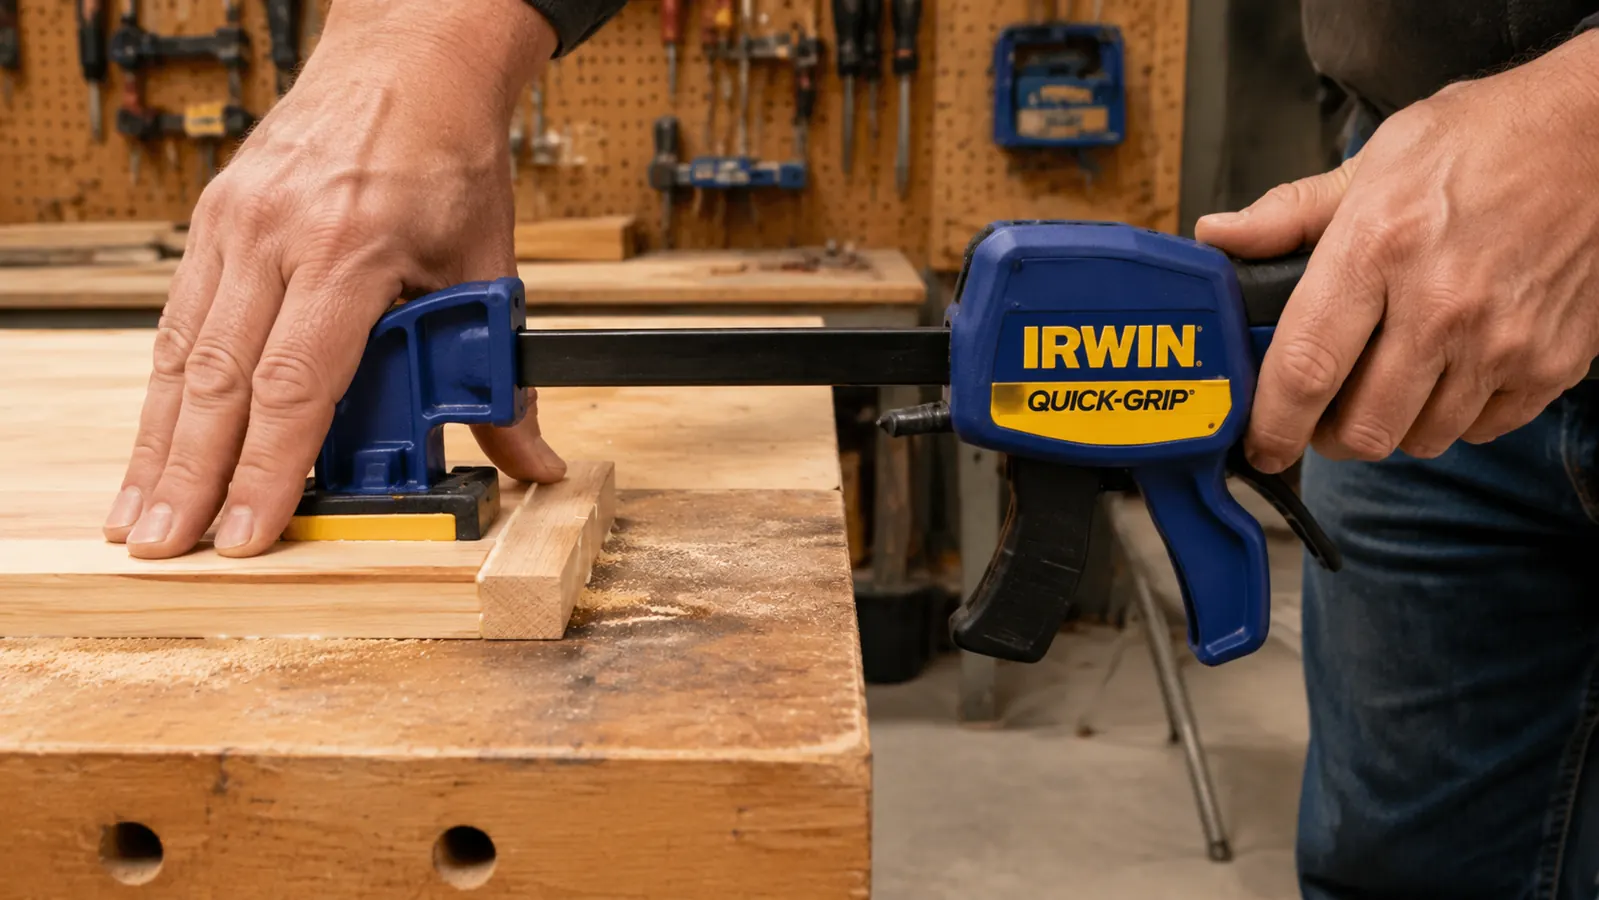
The panel I am using as the example throughout this guide is a 24-inch by 36-inch cherry tabletop made from five boards, each about 5 inches wide after jointing. The process scales up or down cleanly, but a five-board panel is wide enough to show every problem this guide addresses. The clamps I reach for every time are the IRWIN QUICK-GRIP 6-Inch Clamps, rated 4.7 stars across more than 6,800 reviews and consistently the most practical one-handed bar clamp at this price.
Before you squeeze a single drop of glue, make sure you have enough clamps on hand.
The IRWIN QUICK-GRIP 8-piece set gives you enough reach to span a wide panel without hunting for clamps mid-setup, when your glue open time is already running out.
Amazon Check Today's Price on Amazon →Step 1: Joint the Edges Until Light Disappears
A glue joint is only as good as the contact between the two surfaces. Before any glue touches wood, both mating edges need to be dead flat and dead square. Run each board through a jointer if you have one. If you do not, a long hand plane and a straightedge will get you there. The test is simple: hold two boards face-to-face and press the mating edges together against a light source. No light should pass through. If it does, keep going.
One thing that trips people up here is the idea of a very slight hollow in the center of each board, sometimes called a spring joint. The idea is that clamping pressure closes that hollow gap and puts extra pressure at the ends of the joint, which is where glue joints most often fail. If you joint a true flat, that is fine too. But if your edges are convex in the middle, bowed outward, you will have a problem no amount of clamping pressure fixes. Flat or very slightly hollow. Nothing else.
Mark the face of each board with chalk or a pencil to track orientation. Once the edges are jointed, do not set them on concrete or a wet surface. That changes the moisture content at the edge and can cause the board to move before you even glue it up.
Step 2: Do the Dry Fit and Mark Everything
A dry fit is not optional. Clamp the entire panel without glue and look hard at every joint. Check for gaps, check that the panel sits flat on the bench, and count how many clamps you actually need. Then write a number on the end grain of each board in sequence, and draw a triangle or arrow across all the joints on the face so you can reassemble them in exact order after you apply glue. Glue changes things. You will be working faster, your hands will be slippery, and the last thing you need is to be sorting out which board goes where.
While the dry fit is clamped up, check the overall flatness with a straightedge laid diagonally across the panel in both directions. If the assembly is already cupped without glue, something is wrong with your stock. Fix it now. You cannot clamp a cupped panel flat and expect it to stay that way after you release the clamps.
Step 3: Set Up Cauls to Keep the Panel Flat
Cauls are the underrated key to a flat panel. A caul is simply a straight, stiff piece of wood or metal clamped across the width of the panel, perpendicular to the glue joints, to hold the boards in the same plane while the glue cures. Without cauls, clamping pressure alone tends to bow the panel slightly in or out at each joint line.
I use 1-1/2-inch by 3-inch poplar or Douglas fir boards for cauls. They need to be stiffer than the panel they are holding. Cut them a few inches longer than your panel is wide. If you want to be precise, put a very slight crown on the inside face of each caul by planing a tiny hump in the center. That crown pushes pressure toward the panel face at the center, which counteracts the tendency for the panel to lift there. Wax the caul faces with paste wax so glue squeeze-out does not bond them to your panel.
Position cauls about two inches from each end of the panel and every twelve to sixteen inches in between. On a 36-inch-long panel, three cauls is usually enough. Clamp the cauls to the assembly with your IRWIN Quick-Grip clamps after your primary bar clamps are set.
Step 4: Apply Glue and Get Clamping Pressure Right
Standard yellow PVA woodworking glue is what I use for most panels. Titebond II is my go-to. It has about a 10-minute open time, which sounds like plenty until you are spreading glue on five boards and trying to clamp everything before the first joint starts to tack. For a panel this size, I usually have 7 to 8 minutes of usable working time, so I do not stop once glue hits wood.
Spread glue on one face of each joint only. You do not need to coat both mating faces. Use a small foam roller or a stiff brush to get a thin, even coat with no bare spots and no thick puddles. The goal is coverage, not flooding the surface. A thin, consistent film produces a glue line that is nearly invisible when the panel is finished. A thick application mostly just creates more squeeze-out without adding strength.
Get all your clamps within reach before you open the glue. Set them to the rough span you need during the dry fit. The moment you start gluing, you are on the clock.
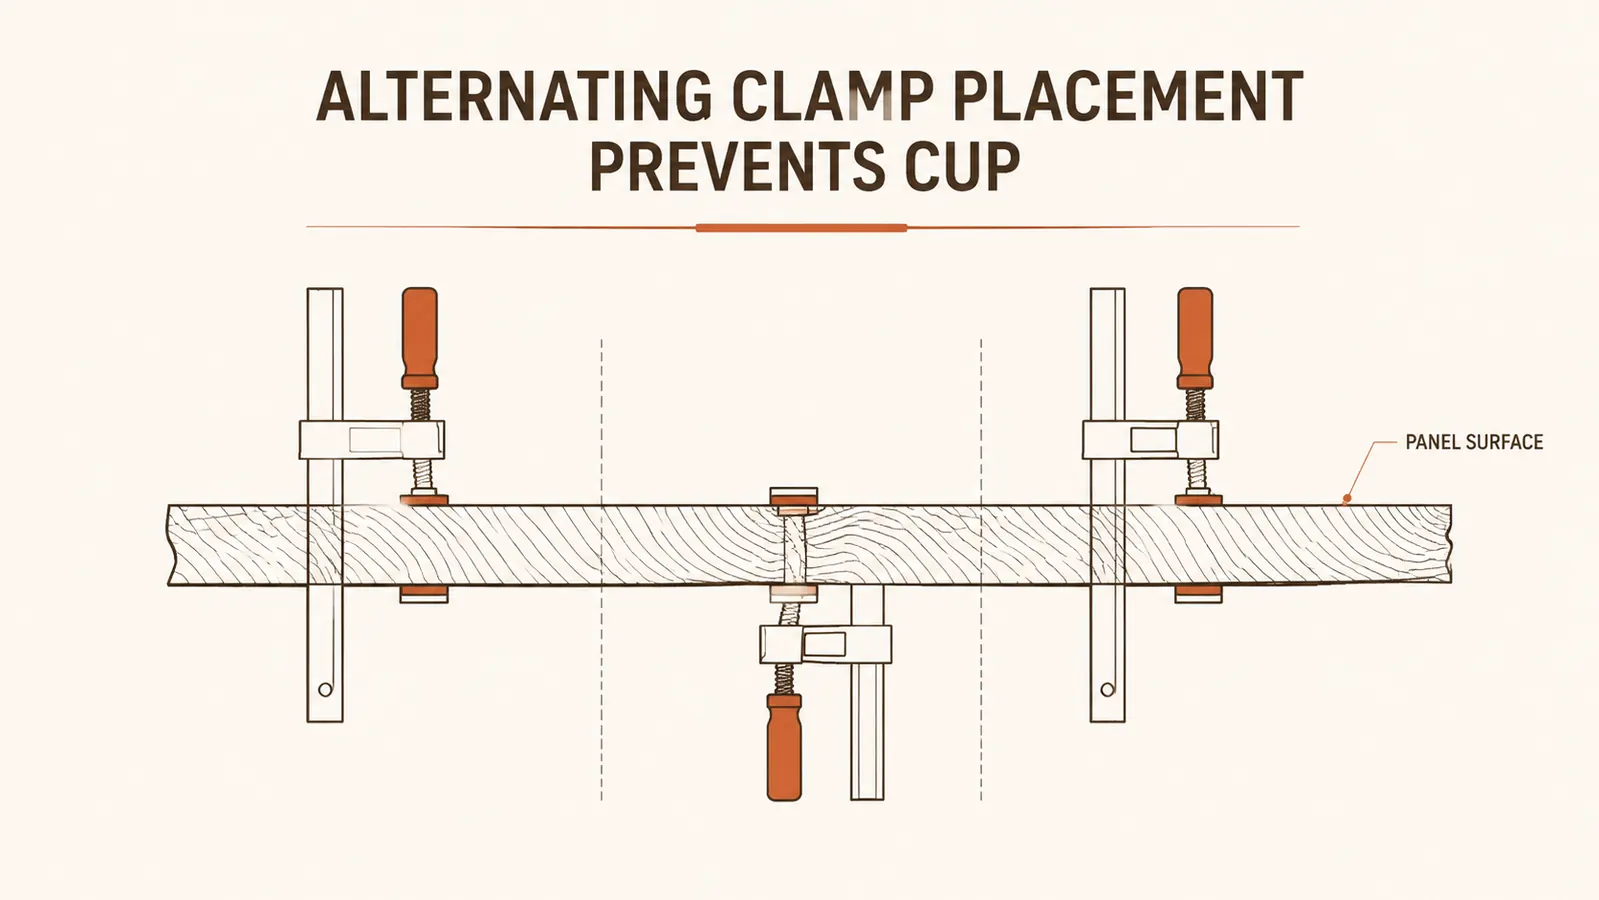
Step 5: Alternate Clamp Directions to Prevent Cup
This is the step most beginners skip and regret. When you run all your bar clamps on the same side of the panel, the clamping force tends to pull that face of the panel toward the clamps. The result is a panel that cups slightly toward the clamp side. To counteract this, alternate your clamp positions: one clamp on top of the panel, the next one underneath, and so on across the length. The opposing forces cancel each other out and the panel stays flat.
On a 36-inch panel I typically use four to five bar clamps spaced roughly every six to eight inches. Start at the center and work outward. Tighten each clamp until you see squeeze-out appearing at the glue line. That is your pressure indicator. You want a thin, consistent bead of squeeze-out running the full length of each joint. If you see nothing, you do not have enough pressure. If glue is pouring out, you went too far and likely pushed most of the glue out of the joint.
Alternate your clamps: one on top, one underneath, all the way down the panel. That single habit eliminates most of the cupping problems I see in beginner glue-ups.
Check alignment at each joint as you tighten. The boards want to slide against each other as you apply pressure. A few hand-tight clamps set before you fully tension anything will hold position. Some woodworkers use biscuits or Domino joints specifically to prevent this sliding. I usually just watch the joints and nudge boards back into alignment quickly if they drift. Once the glue starts to grab, around 5 minutes in, adjustments stop working.
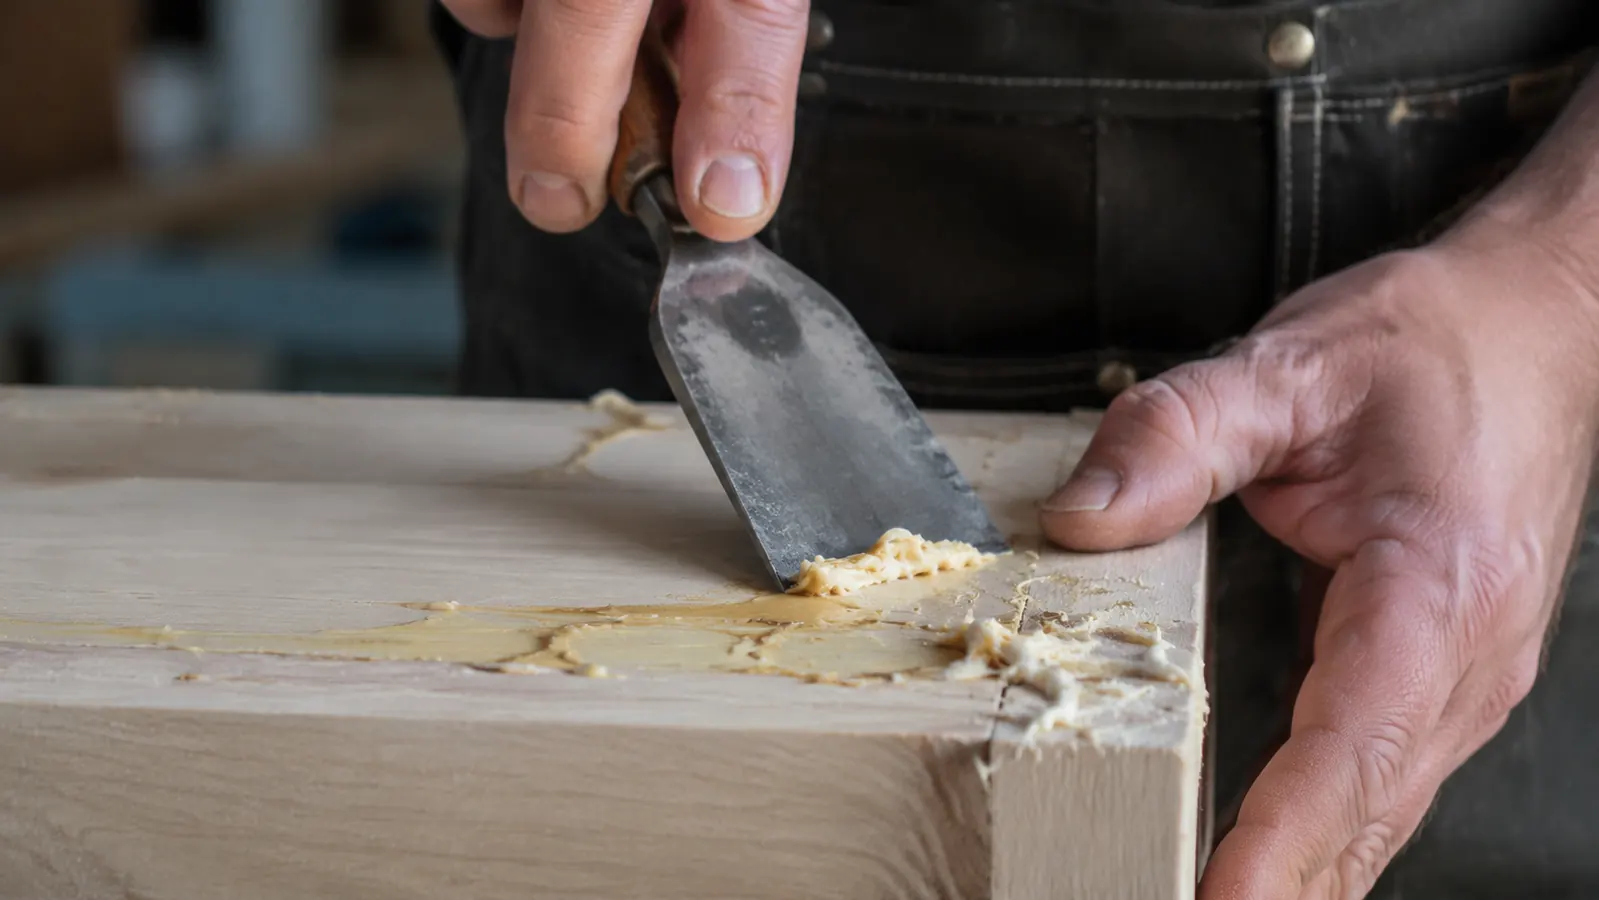
Step 6: Squeeze-Out Cleanup and Cure Time
Do not wipe wet squeeze-out with a wet rag. That drives diluted glue into the wood grain and creates a blotchy area that resists finish. There are two better options. One is to let the squeeze-out become rubbery, usually 20 to 30 minutes after clamping, then slice it off with a sharp chisel held nearly flat to the panel face. It peels right off without pulling glue into the grain. The other option is to let it cure completely and scrape or plane it off the next day. Either works. The wet-rag method does not.
Leave the clamps on for a minimum of one hour for a standard PVA glue at room temperature, 65 degrees or warmer. I usually leave them overnight. Full cure, where the joint reaches full strength, takes 24 hours. Do not put the panel through the thickness planer or do any heavy work on it in the first hour. The clamps can come off at one hour, but the panel needs to rest flat for the full cure before you stress the joints.
After the clamps come off, let the panel sit on a flat surface for another day before any final flattening. If you have free moisture in the wood, it will continue moving a bit. Flatten after it has settled. A cabinet scraper, hand plane, or light passes through a thickness planer all work for final cleanup. If your cauls did their job, you should need to remove very little material.
What Else Helps
A few things I have added to my glue-up process over the years that are not strictly in the steps above. First, matching grain direction across boards makes a big visual difference. Run your hand along each board and find which way the grain rises. Orient adjacent boards so the grain runs in alternating directions. This also helps with future hand planing since you are less likely to tear out alternating boards. Second, bookmatching adjacent boards, where you open them like a book, creates a pleasing symmetry on tabletops that most people notice without knowing why. Third, if you are gluing boards wider than 4 inches each, consider adding a thin film of glue to both faces of the joint, not just one. Wide glue surfaces can have dry spots with a single-side application. For narrow boards, one face is enough.
On the clamp front, the reason I rely on IRWIN Quick-Grip clamps for this work is the one-handed trigger operation. During a glue-up, your other hand is holding a board in alignment. A clamp you can rack up with one squeeze and then fine-tune is a real advantage over a clamp that needs two hands to set. For wide or long panels where I need more reach, I use longer pipe clamps alongside the Quick-Grips, but the Quick-Grips handle the cauls and cross-clamping where bar length is less critical. If you want to understand how they compare to heavier duty options, the full IRWIN Quick-Grip long-term review covers that in detail. For a broader look at why having a full set of these on hand pays off in the shop, see the 10 reasons they belong in every home woodshop.
If you ran short on clamps during your last glue-up, you already know what to fix before the next one.
The IRWIN QUICK-GRIP 8-piece set rated 4.7 stars by over 6,800 woodworkers gives you enough clamps to handle cauls, cross-clamping, and primary bar pressure without borrowing from a neighbor or doing the glue-up in two shifts.
Amazon Check Today's Price on Amazon →