
I've been finishing wood for 25 years, and the single most common mistake I see from other woodworkers is stopping too early. They run 120-grit, maybe 150, wipe on a coat of finish, and then wonder why the surface looks dull, scratchy, or shows swirl marks the second the light hits it at an angle. The problem is almost never the finish product. It's what happened before the finish went on.
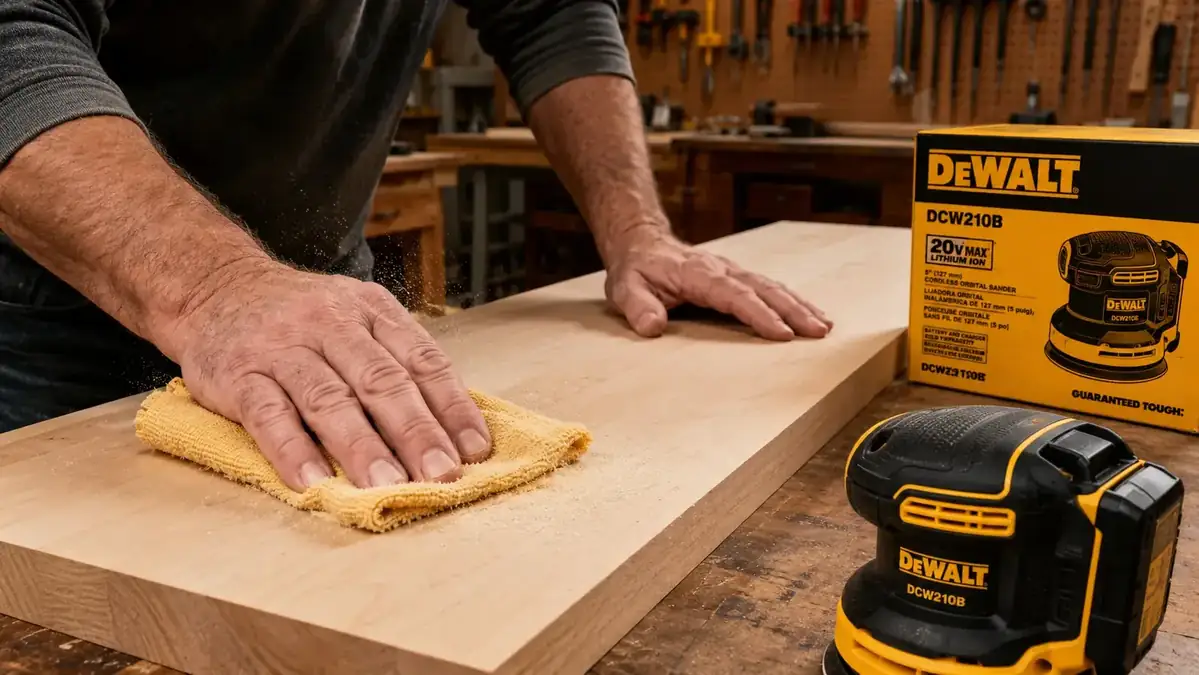
A glass-smooth finish is not a mystery. It's a sequence. Every step in that sequence has a specific job, and skipping one creates a problem the next step cannot fix. I'm going to walk you through the full process I use on every flat surface in my shop, from rough-sanding after milling all the way through your final between-coat scuff. The sander I run for all of it is the DeWalt DCW210B 20V random orbit sander. I've put it through two-plus years of hardwood surfaces, veneered plywood, and softwood projects and it's earned its place on my bench. But the technique matters more than the machine, so let's start there.
If you're still fighting swirl marks, the sander may be half the problem.
The DeWalt DCW210B runs a variable-speed dial from 8,000 to 12,000 OPM, so you can dial back the aggression on delicate surfaces and push harder on rough stock. Check today's price before you read another article about "tips" for a sander that just isn't precise enough.
Amazon Check Today's Price on Amazon →Why Most Woodworkers Never Get a True Glass-Smooth Finish
Random orbit sanders are forgiving tools. They remove stock fast, they rarely leave straight scratch lines, and they're easy to control. That forgiveness is also their trap. Because they work so effortlessly, most people rush through the grits, press down harder than they should trying to speed things up, and never understand what the sander is actually doing to the wood fiber at a micro level.
Here's what's happening under the pad: each grit leaves a pattern of scratches at a specific depth. A coarser grit leaves deeper scratches. A finer grit replaces those with shallower ones. If you jump too far between grits, say from 80 to 150, the 150 cannot reach the bottom of the scratches left by the 80. You'll think the surface looks smooth in the shop light, then apply your finish and watch every skip mark show up in vivid relief. The full grit sequence is not optional. It exists because of physics.
Step 1: Start at 80-Grit to Flatten and Remove Mill Marks
80-grit is your leveling pass. If you've just come off the planer or jointer, or you're dealing with a glue-up with slight height mismatches between boards, this is where you start. The goal at 80 is not smoothness. The goal is flat. Work with the grain in long, overlapping passes, letting the sander's weight do the work. You should feel the pad tracking across the surface, not gouging into it.
Do not press down. This is the most important mechanical tip I can give you for any grit. Pressing down on a random orbit sander slows the pad rotation and creates swirl marks that are almost impossible to sand out later. The DCW210B weighs about 4.5 lbs with a battery installed, and that weight is enough. Rest your hand on the sander's top, guide it, and let the machine work. Cover the full surface, overlapping each pass by about a third of the pad width.
When 80-grit is done, the surface should be flat and dull. You should see a uniform scratch pattern when you hold the piece at a low angle to a light source. Any shiny spots mean the 80 hasn't reached there yet. Keep going until the sheen is completely uniform.

Step 2: Move to 120-Grit and Refine the Scratch Pattern
120-grit is a transitional grit. Its job is to erase the 80-grit scratches and replace them with finer ones. This pass should feel almost effortless if your 80-grit work was thorough. The same rules apply: no downward pressure, overlapping passes, even coverage. At 120 you can start working in wider loops rather than strict linear passes, but still follow the general grain direction.
One thing people get wrong at 120: they rush it because the surface already looks and feels smooth. Don't. Hold the piece under a raking light after you think you're done. Look for any coarser scratch patterns still showing through. They'll appear as slightly darker or shinier bands compared to the surrounding surface. Keep sanding until everything is uniform again before you move on.
Also check your dust extraction here. A plugged bag or a bad connection means abrasive dust packs into the surface rather than evacuating, which turns your sanding paper into a polishing pad that glazes rather than cuts. Connect the DCW210B to a shop vac or dust collector with a proper 1-1/4 inch hose adapter for every pass starting here. Clean dust collection is not optional for a glass-smooth result.
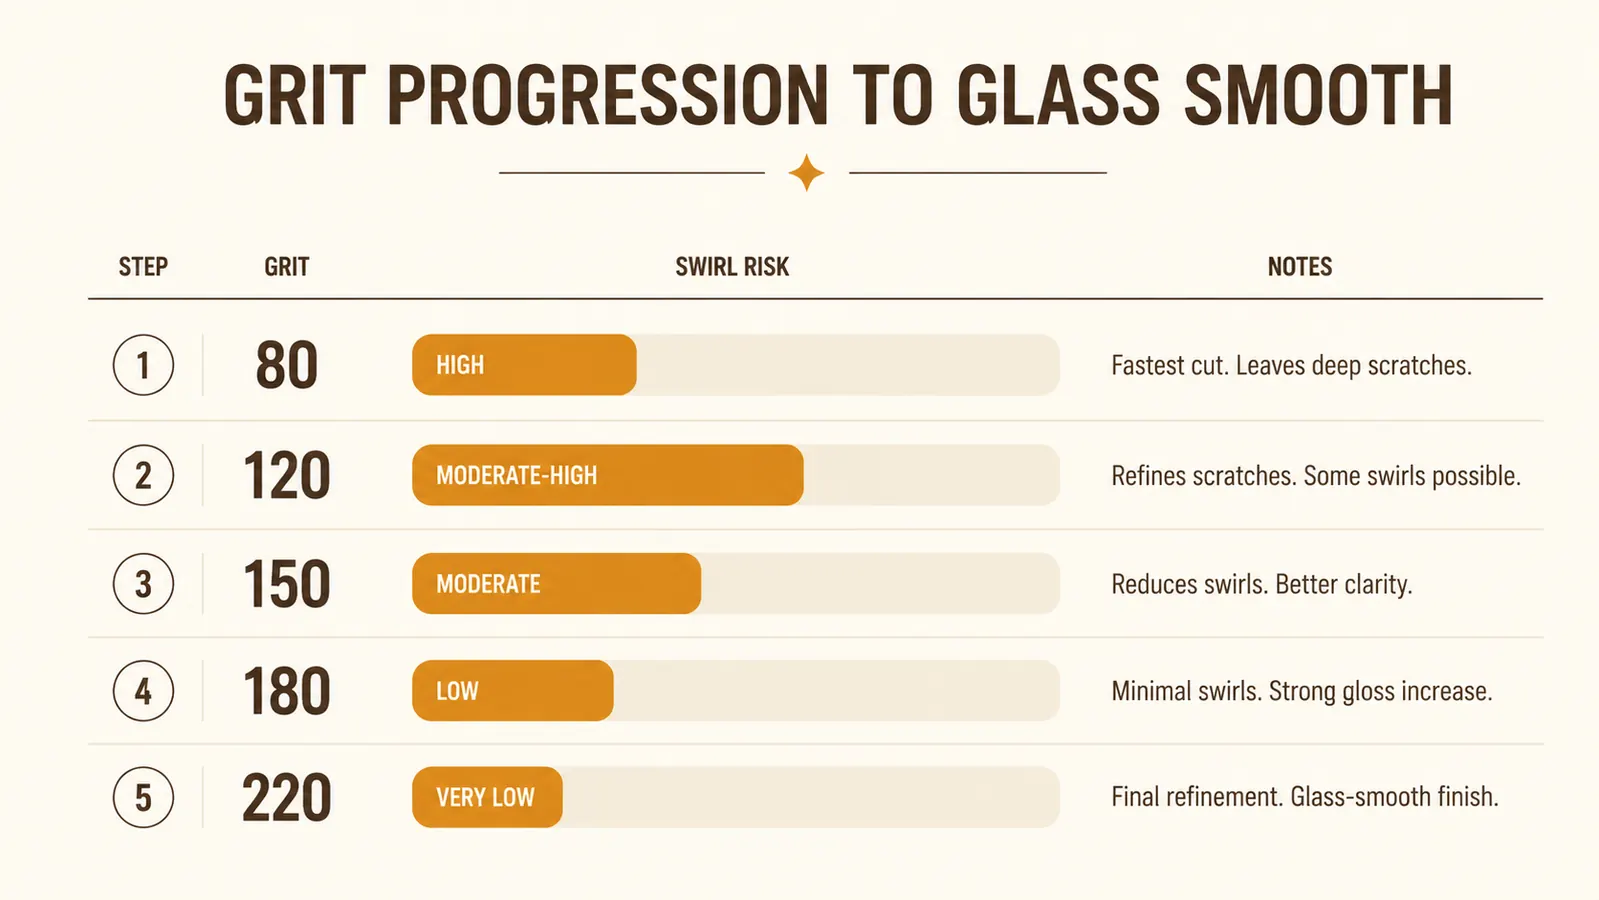
Step 3: Run 150-Grit, Then Do the Water Trick to Raise the Grain
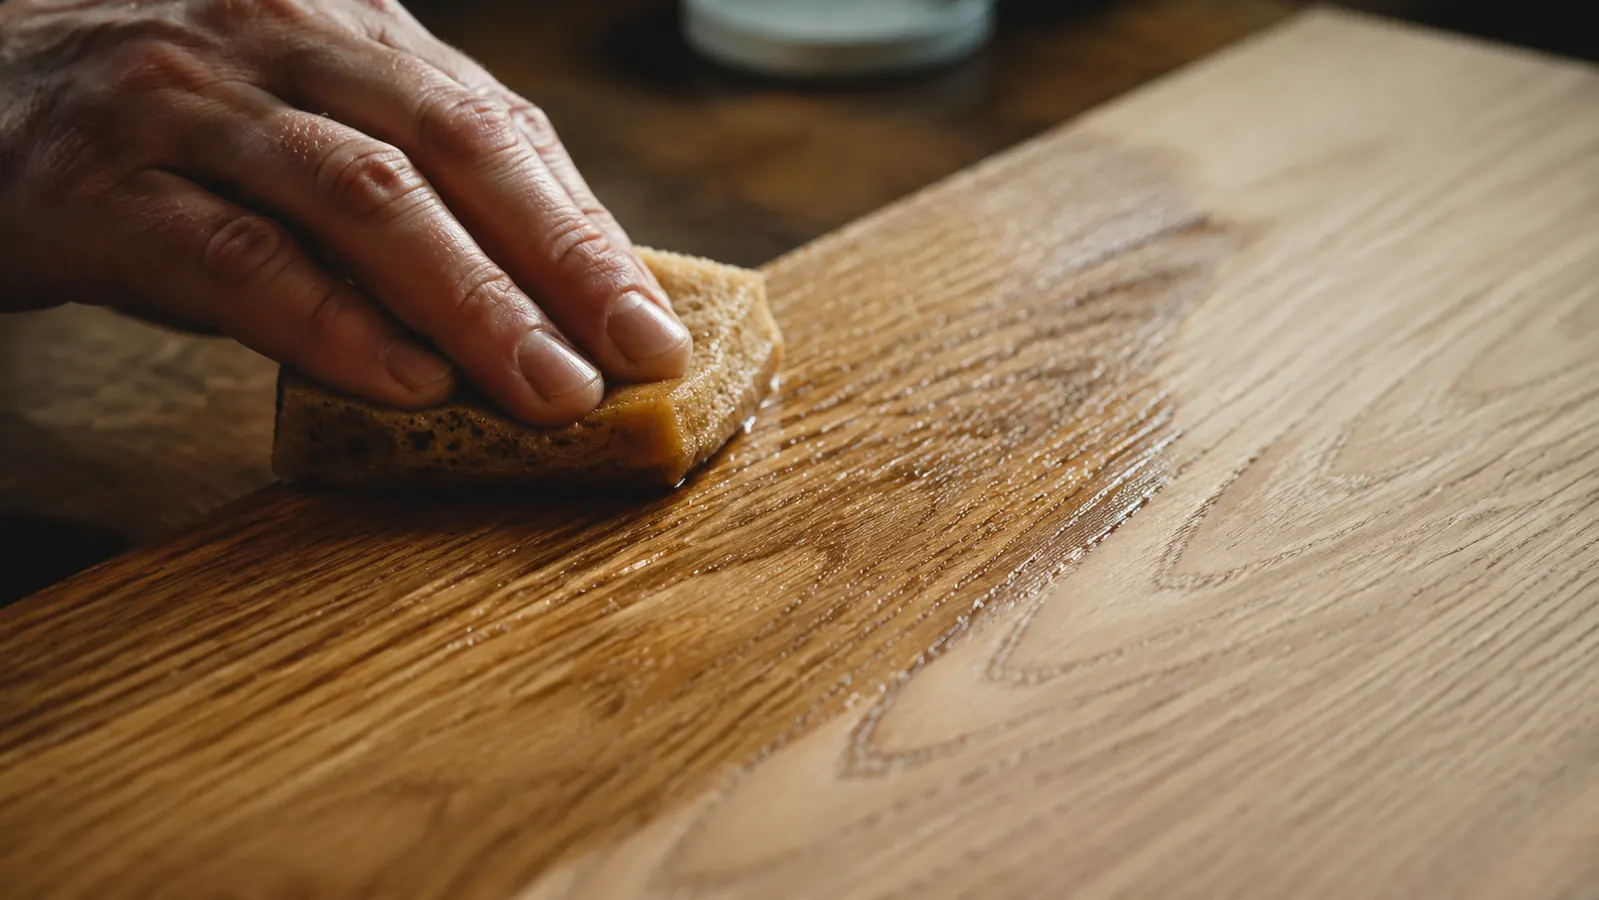
150-grit brings you into true fine-finishing territory. The surface will start to feel noticeably silkier under your fingertips after this pass. Work through the full surface at the same pace as before. When you're satisfied with 150-grit coverage, do something that most beginners skip entirely: raise the grain with water.
Wipe the full surface with a damp, wrung-out cloth or sponge. Not soaking wet, just visibly damp. The wood will absorb the moisture and the grain fibers that were bent flat by the sanding action will swell back up, giving the surface a slightly rough, fuzzy feel. Let it dry completely, which takes 20 to 30 minutes depending on your shop humidity. Then sand again lightly at 150 to knock off just those raised fibers. Now your surface is ready for water-based finishes and the grain will not pop up on your first coat. Skip this step and your first coat of water-based polyurethane or stain will feel like 80-grit sandpaper no matter how carefully you applied it.
Most woodworkers are stopping two grits too soon. The grain-raise pass is not a trick, it's physics. The wood will tell you where it wants to go; your job is to get there before the finish does.
Step 4: Sand to 180-Grit for Pre-Finish Prep
After the grain-raise pass at 150, move to 180-grit. This is the grit that does the real pre-finish work. At 180 the surface should begin to show a slight sheen from the light polishing action. Run the DCW210B at a slightly lower speed setting here, around the middle of its 8,000 to 12,000 OPM range. Slower pad speed at finer grits reduces the chance of swirl marks and gives the abrasive more dwell time per square inch.
Cross-grain passes at coarser grits can help level a surface faster, but at 180 you want to be running with the grain exclusively. The reason is simple: any cross-grain scratch at 180 will show under finish, especially oil-based finishes that add a little color to the wood. Stay with the grain, work in long strokes, and keep the pad flat and moving. Do not let the sander sit in one spot, even for a second.
Step 5: Finish at 220-Grit, Tack Cloth, and Apply Your First Coat
220-grit is your final pre-finish pass. The sander is barely removing material at this point. What it's doing is burnishing the surface, closing the grain slightly, and creating a microscopic surface profile that helps the first finish coat bond evenly. Keep the speed low, keep the pressure at zero, and keep moving. This pass should take less time than any of the earlier ones because the surface is already so close to final condition.
When 220-grit is done, blow off the surface with compressed air if you have it, then go over the entire piece with a tack cloth. Use a fresh tack cloth, not one you've already used on another project. Unfold it fully, fold it back into a loose pad, and drag it across the surface with moderate overlap strokes. You should see the cloth pick up fine dust that looks almost like talc. Do not press hard and do not use a circular motion. Go with the grain, one direction.
Now apply your first finish coat. The surface is ready. For oil-based polyurethane I brush on a thin coat and let it cure fully before touching the surface. For water-based finishes I use a foam applicator and work fast to avoid lap marks. Either way, the finish coat will go on smoothly, lay flat as it cures, and show you exactly why the grit sequence matters: no swirl marks, no grain pop, no scratch lines under the gloss.
Between-Coat Scuffing: The Step That Makes or Breaks the Final Surface
After your first finish coat cures, run your hand across it. It will feel rough, even if the surface looked perfect before you applied the finish. That roughness comes from airborne dust that settled while the finish was wet, from brush drag, and from slight surface tension irregularities in the finish itself. This is normal and it's fixable.
For between-coat scuffing, put away the random orbit sander entirely. Use 320-grit or 400-grit sandpaper by hand, wrapped around a flat block. Sand lightly in the direction of the grain until the surface feels silky and uniform. You're not trying to cut through the finish. You're knocking off the high spots. Wipe with a tack cloth again, then apply your next coat. Repeat this process between every coat. After your final coat cures, you can step up to 600-grit or higher for a true glass finish, then follow with a rubbing compound or finishing oil if you want to push it further.
The sander you saw in the first step earns its keep again at this stage too, but only if you have a soft interface pad between the sander and your fine finishing paper. I run a 3/16-inch foam interface pad on the DCW210B when doing between-coat work on large flat panels. It prevents the edge of the pad from cutting through the finish at the border of the sanding area. For small pieces, do it by hand. For tabletops or wide panels, the sander saves your arm and keeps the pressure more consistent than any human wrist can manage over a large area.
What Else Helps
Good dust extraction makes a bigger difference than most woodworkers expect. Every time you sand with dust re-settling on the surface, you're embedding abrasive particles back into the wood. The DCW210B has an 8-hole hook-and-loop pad that lines up with most major brands of vacuum-ready sandpaper discs. Use them. Connect a shop vac or a dedicated dust collector to the port on every grit from 120 upward. Your discs will also last significantly longer because the abrasive isn't clogging with its own waste.
Lighting matters too. A single overhead bulb is not enough to catch swirl marks before they get locked under finish. I keep a cheap LED strip light on a gooseneck stand that I can angle low across any surface. Rake that light at about 10 degrees from horizontal and you'll see every scratch, swirl, and skip mark that a vertical shop light hides completely. Check your surface at 80, 120, 150, and 180 with raking light before you move to the next grit. It adds a few minutes per grit change and saves you from refinishing work that takes hours.
If you want a deeper look at how the DCW210B handles real shop work over time, including pad wear, battery runtime, and dust bag performance, the long-term review covers two years of use across hardwood and softwood projects. And if you're still deciding whether a random orbit sander deserves priority over other shop tools, the 10 reasons a random orbit sander is essential piece walks through the use cases that make it the first power tool I'd buy in a new shop.
The right sander won't fix bad technique, but bad technique is much easier to fix with the right sander.
The DCW210B's variable speed dial lets you slow the pad for delicate 180 and 220-grit passes, then push faster when you're leveling at 80. The 8-hole dust-evacuation pad keeps your discs cutting clean instead of loading up. Check today's price and see if it fits your shop budget.
Amazon Check Today's Price on Amazon →